How to Display FontAwesome in Firefox Using Rails and CloudFront

Winter is almost upon us; the perfect time for staying indoors and coding!
Topics covered:
- Cloudfront configuration
- Cross-Origin Resource Sharing (CORS) gem
What are we learning?
In my earlier post, I described how to install Twitter Bootstrap in your Rails project. Today, I was updating my portfolio to use CloudFront as a content delivery service. After opening the page in Firefox, I noticed that the FontAwesome icons were missing. This problem did NOT occur when the page was opened with Chrome or Safari. After more than 4 hours of troubleshooting, I had the page loading properly in Firefox. I sincerely hope that this post saves you countless hours and head scratching. Feel free to leave comments or suggestions. ^.^
FontAwesome
When you download FontAwesome, you will notice that there are 4 different files. What are these? FontAwesome comes in multiple formats so the maximum number of users (read: browsers) can see your fonts:
- Safari & Opera browsers = .toff & .otf
- IE9+, Firefox, Chrome = .woff
- iOS and Android = .svg
- IE8 and older = .eot
HTTP Caching
Before we dive head-first into setting up CloudFront, it’s worth taking a slight detour to learn about HTTP caching and headers. According to Heroku, “HTTP caching occurs when the browser stores local copies of web resources for faster retrieval the next time the resource is required. As your application serves resources it can attach cache headers to the response specifying the desired cache behavior.” For our purposes, we need to understand cache header.
Firefox and IE9+ reject all cross-site font requests unless some specific headers are set, i.e. “`Access-Control-Allow-Origin“`. In other words, Firefox will not display a font if you use CloudFront to deliver content. For in-depth understanding, read more here and here. We’ll need to figure out a way to allow Firefox access to the fonts.
Configuring CloudFront

Ahhh, we have finally arrived at the meat and ‘taters of this article. Let’s set up CloudFront (if you have questions, refer to this post on Heroku. But first, what IS CloudFront? Many developers use Amazon S3 (simple storage service) to store static assets (e.g. images, javascript, CSS). It is also sometimes used to serve those assets, but this is not recommended because the S3 was not designed to serve files when your website is under heavy traffic. CloudFront is referred to as a Content Delivery Network (CDN), and acts to serve those assets that you stored on S3.
CloudFront setup
- Make an AWS account.
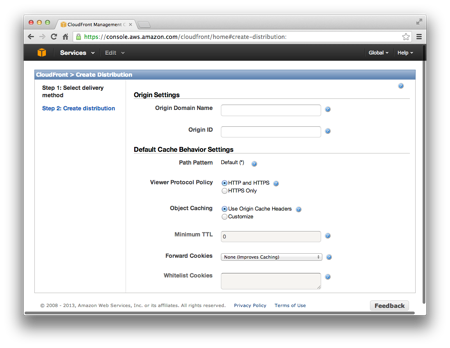
- Login to your account, and go to CloudFront control panel. Click ‘Create distribution’, and when prompted for the delivery method, select ‘Web’. For now, use defaults. NOTE: If you wish to use CNAME, you must enter your domain under ‘Origin Domain Name’.

Configure CloudFront and Rails
1) In your Rails application, go to config/environments/production.rb.
2) Look for the setting labelled asset_host. This setting is responsible for prepending a domain onto all asset links created via the built in asset helpers.
3) In your CloudFront Management Console, select the distribution that you created. Click the link “Distribution Settings”. Look for the subheader Domain Name, and copy that domain name. In your Rails app, paste in the domain: config.action_controller.asset_host = "< YOUR DISTRIBUTION SUBDOMAIN>.cloudfront.net".
Purge content from CloudFront
We need to create an invalidation in the CloudFront Panel.To read more about why, go here
Let’s find our fontawesome assets. In your terminal, go to: ~/project_name/public/assets and type ls -al fontawesome-webfont-*.*. You should see something like this:
1
2
3
4
fontawesome–webfont–4d228e1a1ddd570d6380dcd9b1a11d5c.ttf
fontawesome–webfont–6cfa562c51325bb1df40b64732dc8699.woff
fontawesome–webfont–9169b7b7c593388d41dd3c339df5b86b.svg
fontawesome–webfont–e742c0f297e307a74bdf4ca3c19073a2.eot
Back in the CloudFront Panel, choose the tab Invalidations. Click .

Paste in the above assets like this:
1
2
3
4
assets/fontawesome–webfont–4d228e1a1ddd570d6380dcd9b1a11d5c.ttf
assets/fontawesome–webfont–6cfa562c51325bb1df40b64732dc8699.woff
assets/fontawesome–webfont–9169b7b7c593388d41dd3c339df5b86b.svg
assets/fontawesome–webfont–e742c0f297e307a74bdf4ca3c19073a2.eot
IMPORTANT Don’t forget to add assets/ in front of the fontawesome.
Click . Now wait for 5-10 minutes CDN cache to become invalidated.
Install the CORS gem
In your Gemfile:
1
gem 'rack-cors', :require => 'rack/cors'
bundle.
In your project folder, go to: config/application.rb and add the following:
1
2
3
4
5
6
7
8
9
10
11
12
13
14
15
16
17
18
19
20
module Portfolio
  class Application < Rails::Application
  # …
    config.middleware.insert_before ActionDispatch::Static, Rack::Cors do
    allow do
      origins ''
      resource '',
      headers: :any,
      methods: [:get, :options]
    end
  end
  #…
    config.assets.paths << Rails.root.join("app", "assets")
    config.assets.precompile += %w( .svg .eot .woff .ttf )
    config.assets.header_rules = {
      :global => {'Cache-Control' => 'public, max-age=31536000'},
      :fonts  => {'Access-Control-Allow-Origin' => '*'}
    }
  end
end
The first part of this configuration puts the CORS gem at the top of your stack. Confirm this by running rake middleware in your terminal. Any header is now able to be retrieved via the get method. The second part precompiles the FontAwesome assets by specifically looking for their file extension. It also allows font control via the header_rules.
Push to Heroku
You are now ready to push everything up to Heroku. Don’t forget to manually precompile assets, if necessary.
Additional Resources
Rails, S3, and asset sync
HTTP caching with Rails
Rack::Cache